A digital camera uses an array of millions of tiny light cavities or
"photosites" to record an image. When you press your camera's shutter
button and the exposure begins, each of these is uncovered to collect
and store photons. Once the exposure finishes, the camera closes each of
these photosites, and then tries to assess how many photons fell into
each. The relative quantity of photons in each cavity are then sorted
into various intensity levels, whose precision is determined by
bit depth (0 - 255 for an 8-bit image).
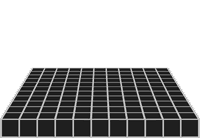 Cavity Array
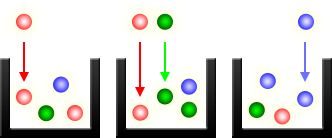 Light Cavities
However, the above illustration would only create grayscale images,
since these cavities are unable to distinguish how much they have of
each color. To capture color images, a filter has to be placed over each
cavity that permits only particular colors of light. Virtually all
current digital cameras can only capture one of three primary colors in
each cavity, and so they discard roughly 2/3 of the incoming light. As a
result, the camera has to approximate the other two primary colors in
order to have full color at every pixel. The most common type of color
filter array is called a "Bayer array," shown below.
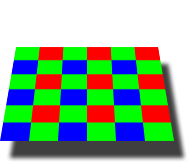 Color Filter Array
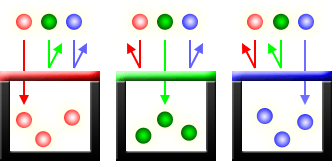 Photosites with Color Filters
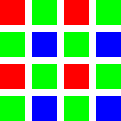
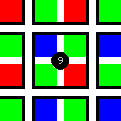
A Bayer array consists of alternating rows of red-green and
green-blue filters. Notice how the Bayer array contains twice as many
green as red or blue sensors. Each primary color does not receive an
equal fraction of the total area because the human eye is more sensitive
to green light than both red and blue light. Redundancy with green
pixels produces an image which appears less noisy and has finer detail
than could be accomplished if each color were treated equally. This also
explains why noise in the green channel is much less than for the other
two primary colors (see "
Understanding Image Noise" for an example).
 Original Scene
(shown at 200%)
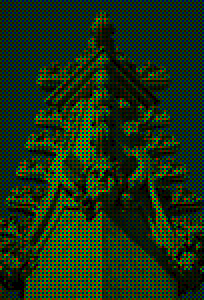 What Your Camera Sees
(through a Bayer array)
Note: Not all digital cameras use a Bayer array, however
this is by far the most common setup. The Foveon sensor used in Sigma's
SD9 and SD10 captures all three colors at each pixel location. Sony
cameras capture four colors in a similar array: red, green, blue and
emerald green.
BAYER DEMOSAICING
Bayer "demosaicing" is the process of translating this Bayer array of
primary colors into a final image which contains full color information
at each pixel. How is this possible if the camera is unable to directly
measure full color? One way of understanding this is to instead think
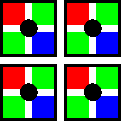
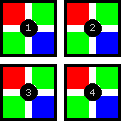
of each 2x2 array of red, green and blue as a single full color cavity.
 |
→ |
 |
This would work fine, however most cameras take additional steps to
extract even more image information from this color array. If the camera
treated all of the colors in each 2x2 array as having landed in the
same place, then it would only be able achieve half the resolution in
both the horizontal and vertical directions. On the other hand, if a
camera computed the color using several overlapping 2x2 arrays, then it
could achieve a higher resolution than would be possible with a single
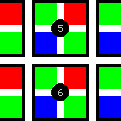
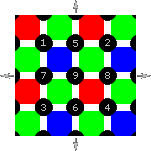
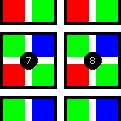
set of 2x2 arrays. The following combination of overlapping 2x2 arrays
could be used to extract more image information.
Note how we did not calculate image information at the very edges of
the array, since we assumed the image continued on in each direction. If
these were actually the edges of the cavity array, then calculations
here would be less accurate, since there are no longer pixels on all
sides. This is no problem, since information at the very edges of an
image can easily be cropped out for cameras with millions of pixels.
Other demosaicing algorithms exist which can extract slightly more
resolution, produce images which are less noisy, or adapt to best
approximate the image at each location.
DEMOSAICING ARTIFACTS
Images with small-scale detail near the resolution limit of the
digital sensor can sometimes trick the demosaicing algorithm—producing
an unrealistic looking result. The most common artifact is moiré
(pronounced "more-ay"), which may appear as repeating patterns, color
artifacts or pixels arranges in an unrealistic maze-like pattern:

Second Photo at
↓ 65% of Above Size

Two separate photos are shown above—each at a different
magnification. Note the appearance of moiré in all four bottom squares,
in addition to the third square of the first photo (subtle). Both
maze-like and color artifacts can be seen in the third square of the
downsized version. These artifacts depend on both the type of texture
and software used to develop the
digital camera's RAW file.
MICROLENS ARRAYS
You might wonder why the first diagram in this tutorial did not place
each cavity directly next to each other. Real-world camera sensors do
not actually have photosites which cover the entire surface of the
sensor. In fact, they often cover just half the total area in order to
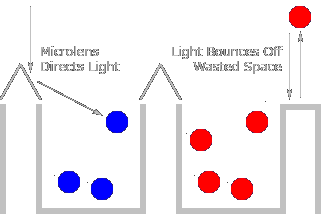
accommodate other electronics. Each cavity is shown with little peaks
between them to direct the photons to one cavity or the other. Digital
cameras contain "microlenses" above each photosite to enhance their
light-gathering ability. These lenses are analogous to funnels which
direct photons into the photosite where the photons would have otherwise
been unused.
Well-designed microlenses can improve the photon signal at each
photosite, and subsequently create images which have less noise for the
same exposure time. Camera manufacturers have been able to use
improvements in microlens design to reduce or maintain noise in the
latest high-resolution cameras, despite having smaller photosites due to
squeezing more megapixels into the same sensor area.
 Cavity Array
 Light Cavities
 Color Filter Array
 Photosites with Color Filters
 Original Scene
 What Your Camera Sees



Niciun comentariu:
Trimiteți un comentariu