marți, 22 ianuarie 2013

How to Create Professional HDR Images

What you need:

1. A digital camera that allows you to set exposure manually.

2. A sturdy tripod.

3. A subject (i.e., what you're taking the picture of) that does not move.

4. A computer with Photoshop CS2 installed.


If you have a camera that supports it, it also helps to have a "cable release", which is basically a little shutter button that attaches to your camera via a wire, so when you push the button to take the picture, you don't nudge the camera at all.


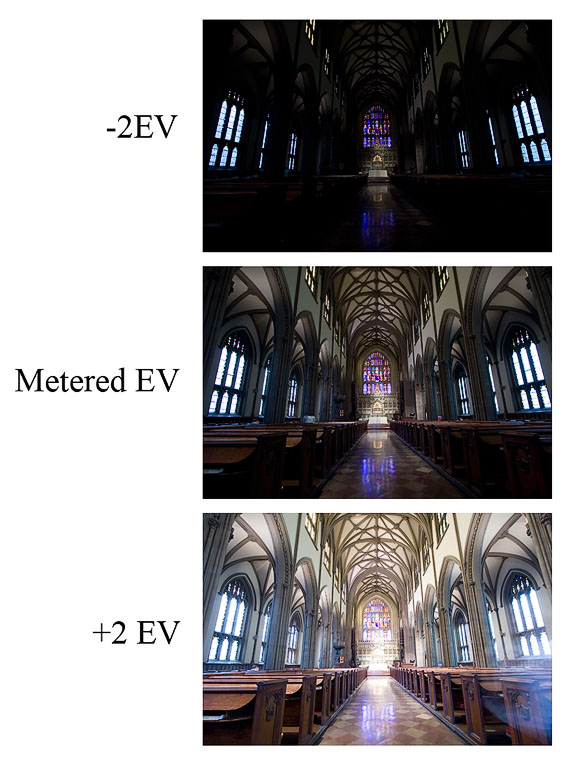
First off, you need to take the photographs. Because you are attempting to create a high-dynamic-range image, it makes a very good deal of sense for you to set your camera so that it shoots your photographs in your camera's RAW mode. The reason for this is that the RAW format captures more dynamic range data than is available in the alternative, the JPEG file. It also gives you a great deal of color temperature latitude -- you can set the color temperature of all of your photos very easily after the fact. You also need to set the camera to manual exposure mode. Tripod your camera so that it doesn't move, then compose the scene you want to shoot. Note that, like long-exposure photography, HDR works best when your subject isn't moving. Also, if your camera has a changeable ISO setting (most do), set it as low as possible to avoid noise. Meter your scene. Select the aperature you wish. The object here is to bracket your photos (i.e., take a photo of the same scene several times with different shutter speeds), either automatically or manually. Some high-end cameras bracket automatically, some don't. It's important that you change the shutter speed, NOT the aperature -- the reason being that since you will be combining several images to make one, you don't want your DOF to change between shots. Once you have your scene set, your camera set and tripoded, and your settings set -- take your pictures. I personally usually like to take quite a few photos over the range -- for example, I'll take photos at -6EV, -4EV, -2EV, metered EV, +2EV, +4EV, and +6EV. That may seem like a bit much, but going overboard doesn't hurt anything and gives you more latitude in toning. However, you can get by with less, as I have in the below example:


Okay, so you have your three (or more) photos! Transfer them from your camera onto your computer. Done? Done. Now, how do you take those three photos and create a new, magical HDR image? Simple.


First, find your three photos either using Windows explorer or the Adobe Bridge program that comes with CS2.


Highlight them, and open them with Photoshop at the same time by dragging them into Photoshop.


Okay, you've got it open. The important things to do here are to


A: make sure that all three photos are the same color temperture and tint

B: make sure that you turn off ALL the automatic checkboxes.


You can pick any color temperature you think looks like what you saw -- the important thing is that they're all the same. Done? Now click "Done". By clicking done, you are telling Photoshop to remember these settings -- which is important, because in a moment you're going to have Photoshop automatically open all of these photos up again.


Okay, now to make the HDR. Go into the File menu, then the Automate submenu, then select "Merge to HDR":


In the dialog box the pops up, select the files you want to use to make the HDR. Do not check the "Align automatically" box, unless you screwed up your tripoding and moved the camera between photos. The automatic alignment feature doesn't usually work so great, so it's really a last resort.


You will end up with a preview window that shows you a preview of your HDR that looks like this:


Just click okay -- you don't need to adjust the histogram up there at all, all that effects is the preview, it has no effect on the final image. (*edit*, okay, it DOES affect the baseline for the curves in the next step but for all practical purposes it doesn't matter for what we're trying to do. Thanks to Adobe for pointing this out to me.) After a loooong while (or a short while if you have a fast computer and a lot of RAM), it'll finish and show you your new HDR image. Cool! You can save this file if you want; it's a 32 bit image file that contains all the exposure data from all of your shots. Doesn't look like much, but that's because you don't have an HDR monitor. One day, HDR monitors will be commonplace -- so keep that file handy. :)


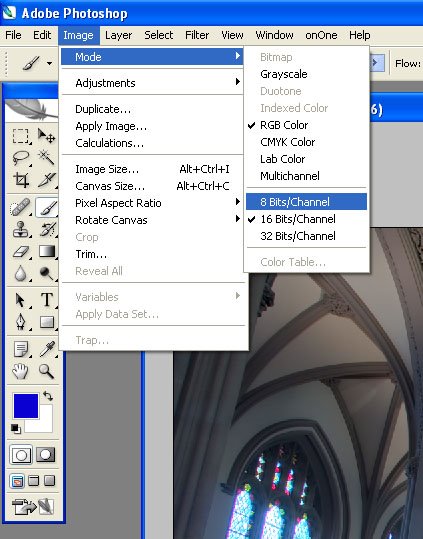
But wait, we're not done yet! We want the photo to look good on our monitor. How do we do that? Easy, we downsample. Go to the Image menu, the mode submenu, and select "16 bits per channel".


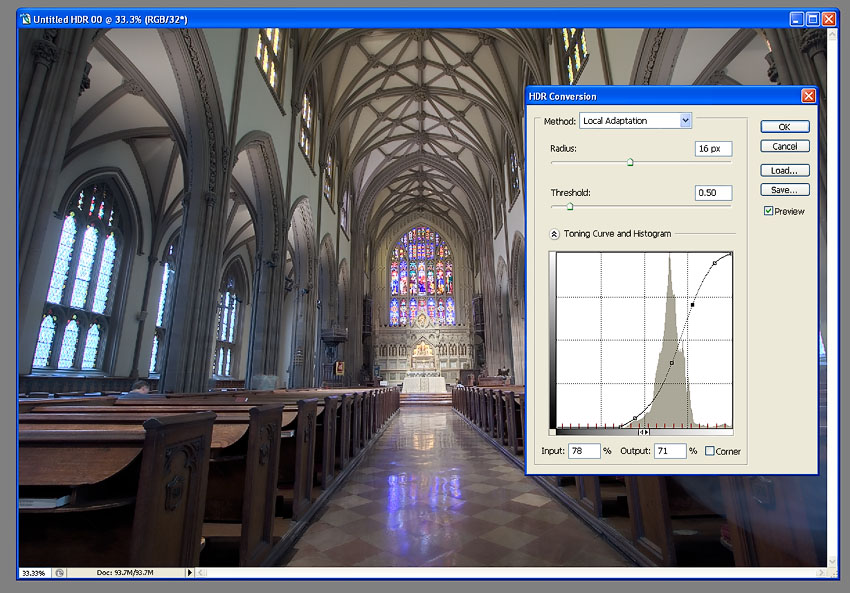
You end up with a new menu. Toggle the Histogram arrow at the bottom to show the histogram. Go into the little menu at to and select "Local Adaptation":


Click OK. Whoa! Crazy, huh? Doesn't look so great, most likely. This is just the preview window, though, showing you what it will probably look like when Photoshop is done converting it. The first thing you need to do is bring the left hand side of the histogram to the beginning of the shadows information, as shown below:


Okay, cool! Looks better. Now work the curves until you're happy. If you don't know how to use curves in Photoshop, wikipedia or a search engine is your friend. :) Here's what I did to this one:


When you're done, click okay. After a little while, viola! You get a nice 16 bit image. Tone this to your taste using whatever toning tools you know. Save it as a 16bit TIFF file, if you like. However, when you're done, you need to downconvert it to 8-bit in order to save it as a JPEG. Go to the Image menu, the mode submenu, and select "8 bits per channel".


Viola^H^H^H^H^H Voila, the finished product has arrived!


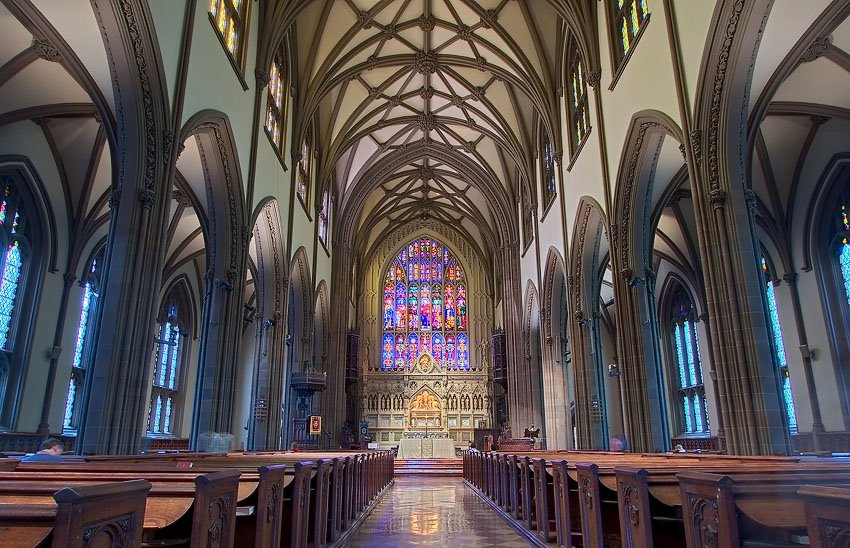
Save it as a Jpeg and you're done. See, not too hard -- and it's a great new world of photography to explore.

How to make high key photos

What is High Key Photography?

High key photography uses unnaturally bright lighting to blow out most or all harsh shadows in an image. High key methods were originally developed as a solution to screens that couldn’t properly display high contrast ratios, but has developed into more of a stylistic choice.
High key images usually convey a positive or upbeat tone. This method is perfect for a subject that is funny, lighthearted or beautiful.
high key photography tips
You see high key used regularly for model photography, flowers and other subjects that are relatively feminine in nature. Another area perfect for high key is product photography. Practically speaking, the bright nature of the photo really highlights the product and can make for some great attention-grabbing contrast. Psychologically speaking, a product shown on white tends to suggest that it is high quality or upscale in nature.
high key photography tips
The Nikon image above probably reminds you of a number of ads you’ve seen for premium products like the iPhone. Apple is fond of using high-key artwork and photography to show off their line of super-stylish electronic devices.
The opposite of high key is of course low key. Instead of eliminating shadows as in high key photography, low key photographers utilize dark scenes and heavy contrast to convey a sense of drama or foreboding.
high key photography tips

Lighting Equipment

Effectively shooting indoors in high key is not easy if you don’t have the proper equipment (outdoors on a bright day can be easier and cheaper). If you want to achieve that studio, white background look, ideally you’ll have some studio lighting on hand.
high key photography tips
Getting started with studio lighting can be quite expensive. Many starter kits are available from a range of manufacturers. Depending on the quality and amount of equipment you want, you can expect to spend anywhere from $200-$1700 and beyond.
Lighting conversations can quickly become complicated, but I’ll try to keep it simple here. Basically, you have two primary options: continuous lighting or flash. Within continuous lighting you can choose from either tungsten (hot lights) or fluorescent (cool lights.) Tungsten lights tend to run really hot and produce warmer looking light while fluorescent lights run fairly cool by comparison and produce something more comparable to daylight (source).
The problem with both of these is that they are fairly low-powered, which can make it difficult to pull off high key photography if your lights are good enough. Alternatively, flashes are more versatile and powerful and are therefore the only choice for many studio photographers.
Ultimately, it’s quite difficult to get a good feel for a lighting kit until you get your hands on it. The best you can do if you’re purchasing online is to do your research and read plenty of reviews. Below are a few lower-end affordable options to begin your search with.

CowboyStudio 330 Watt Three Light Kit: $290.99

  • 3 Monolight Studio Flash/Strobes
  • 3 Softboxes
  • 1 Boom Kit w/Sandbag
  • 1 24″ Photo Tent

Smith-Victor FL-130 3 Light Studio Flash Kit: $338.95

  • 3 Monolight Kits
  • 2 Black-Backed White Umbrellas Are Included
  • 3 Aluminum Stands
  • 1 Hard Carrying Case

Britek Flash Light Kit with Boom – total kit 576 wt: $534.99

  • 2 HS-600 Flash Lights 168 w/s
  • 2 PS-200 Flash Light s120w/s
  • 4 Modeling Lamps for HS,PS Series
  • 4 Reflectors
  • 4 Modeling Lamps for HS,PS Series
  • 2 32″ Silver Photo Umbrellas
  • a lot more…

Lighting Setup

Once you’ve got some decent lights, you’ll need to set up your studio environment. Don’t mistake the information below as the single right way to shoot high key photography. There are tons of places and ways to get a good high key shot, this is just to give you a good idea of one of the most popular methods of achieving the effect.
Ideally you’ll have at least three lights, four if you’ve got the equipment. You’ll also need a seamless white backdrop of some kind. Many professionals mount a 9 ft wide roll of paper high on stands, then roll it down across the background and onto the floor of the shot. If you’re on a budget or in a hurry you can try using a sheet (watch for wrinkles) or an empty wall.
Position your subject in the center of the backdrop and make sure to keep the shot’s frame within the bounds of the paper so no gaps are showing. Next setup a key light and a fill light. The key light is off to one side and is your main source of light on the subject. Make sure the lighting on the subject is fairly flat. As strange as that sounds, remember that you’re not going for contrast here but brightness throughout.
Having your key light to one side will likely produce harsh shadows on the opposite side of the subject. Here you setup a less bright fill light to smooth out some of those areas. Shooting with only these two lights will produce a gray, shadow-filled background. Since we’re going for solid white, you need to eliminate these shadows by using one or two lights angled and pointed at your backdrop.
high key photography tips
The key here is experimentation. Don’t worry if you end up with a lot of bad shots at first, it can literally take hours to figure out a decent light setup if you’re new to studio flash photography.
One thing to watch out for is the light bouncing off your backdrop, which can cause strange halos around your subject. At the same time, you want to make sure you’re blowing out the backdrop enough to get a fairly solid white. Deborah Wolfe from Studio On a Shoestring recommends that you keep your background lights at least one f-stop over your subject lighting and meter the lighting for your subject to produce an overall setting of f/11.

Camera Settings

To evaluate camera settings for a given technique, I always like to take a look at a real example and inspect what the photographer did to achieve the effect.
high key photography tips
This photo was taken with a Sony DSLR-A350, with an exposure of 0.2 sec (1/5), an aperture of f/5.6, an ISO of 100, and an exposure bias of +2 EV. Notice that all of these settings are aimed at letting in lots of light.
The 1/5 sec exposure is quite long and would normally produce a blurry photo if not for a couple of factors. First, the subject isn’t moving. Fortunately, flowers are fairly immobile and tend to stay pretty still while you’re shooting (barring any wind). Unfortunately, you don’t have the same luxury with people.
Secondly, the camera was probably mounted on a tripod. With such a long exposure you’ll want to use a tripod whenever possible to avoid camera shake. Finally, the flash actually serves to freeze the subject in place so that even if you’re shooting a person, handheld with a long exposure, it’s a fairly easy to get a crisp image.
The 5.6 aperture is neither really high nor really low. The shot looks like it would’ve been taken down below f/3 but because it’s so close the DOF looks fairly shallow even above 5.0, which allows for more light to be let in without sacrificing a nice blurry background.
Finally, the 100 ISO tells us there was already a lot of available light in the seen and the exposure bias is pumping up the brightness even further.
What you can learn from this is that you’re definitely going to want to shoot at 100-200 ISO in a bright environment with a f-stop that’s high enough to give you a really bright scene. Feel free to shoot way up at f/11 or higher if you’re not aiming for a blurry background and don’t have strong enough lights to fill the area well. You’ll also want to lengthen your exposure to brighten the scene as much as you can without blowing out the highlights or causing blur from camera shake or model movement.

Conclusion

To sum up, high key photography seeks to eliminate harsh shadows and create a bright environment. It is generally used to convey an upbeat, funny or beautiful subject but can be manipulated to communicate a number of moods and concepts.
If you want to shoot high key indoors, it’s best to have some studio lighting available, preferably 3-4 flashes: two on your subject, two on the backdrop. Also, make sure your camera’s settings are optimized to let in lots of light. Make sure there’s enough to brighten the scene considerably without blowing out the subject.
If you’ve got some nice high key shots to show off, be sure to leave a link in the comments and share your methods with us!

How To Do Low Key Photos


What is Low Key Lighting?

Low key refers to a style of photography that utilizes predominantly dark tones to create a dramatic looking image. Where high key lighting seeks to over light the subject to the point of reduced contrast, low key lighting intensifies the contrast in an image through intensely reduced lighting.
low key photography tutorial
The key here is not just to produce a dark image but to use lighting very selectively so that only specific portions of the image are illuminated. Normally as a photographer, you spend your time trying to avoid harsh shadows, especially on faces and around the subject’s eyes. For this reason, shooting low key can actually be a fun change of pace.
Instead of avoiding intense shadows, you’ll have to consider them as the primary element of the composition; one that defines the mood of the entire photograph. The trick then becomes manipulating your lighting and the positioning of your subject so that the shadows fall in just the right spots to create the look you want.

Low Key Lighting In Art

Artists recognized the power of low key lighting long before photographers came around. Painters during the Renaissance and Baroque periods often used a technique known as “chiaroscuro” to achieve a similar dramatic tone for their images. Chiaroscuro comes from the Italian “chiaro” meaning clear/light and “oscuro” meaning obscure/dark.
Chiaroscuro was used not only for drama but also to bring realism to a painting. The varied lighting creates a sense of three dimensional depth that can be quite stunning.
low key photography tutorial
One of my favorite artists that utilized this technique was Caravaggio. He created several works, such as The Incredulity of Saint Thomas (seen above), that really capture the essence of what chiaroscuro was all about. Other great examples of artists who used this technique include Gerrit Van Honthorst, Tintoretto, El Greco and even Rembrandt to a lesser degree.

Low Key in the Studio

If you have your own photo studio, there are lots of ways to setup low key shots that will give you fantastic results. First, make sure you have a large black backdrop. As a general rule, try to avoid hitting with any lights in such a way that it shows texture, wrinkles, etc.
You can definitely have a low key portrait with other types of backdrops, but this will help you achieve that classy solid black look that comes to mind when you think of low key photography.
low key photography tutorial
For an easy and affordable setup, position your subject a bit away from the backdrop and use a single flash off to one side. Also, make sure you turn the power way down on the flash so it doesn’t blow out your subject too much.
low key photography tutorial
This should give you fairly dramatic results with all the lighting biased towards one side of the image as in the example below. Notice how a little bit of the backdrop is illuminated in this image. Depending on your specific preferences, this could be either desirable or something to watch out for and try to prevent.
low key photography tutorial
If you want to provide a little backlighting, consider dropping in a reflector and/or placing another flash well behind the subject and off to the side. This will give you some nice hair light and can often create a sort of halo effect.
low key photography tutorial
As always, don’t expect to nail it on your first shot. Play around with different locations for both your light and your subject as well as different intensities for your flash. Resist the urge to think too much about what you can pull back out of the image in Photoshop and try to create the results you want up front. Getting into this habit will force you to learn the ins and outs of your equipment better and reduce the time spent in post-production.

Low Budget Low Key

If you’re not lucky enough to have your own home studio, fret not. There are still plenty of ways to get a decent low key shot on a shoestring budget using only your camera and common household resources.
One trick that I’ve seen quite often is to use a two room setup with a door. The main room should be one that you can get completely dark, preferably with no windows or other natural sources of light. With the room as dark as you can make it, position your subject somewhere in front of the door.
low key photography tutorial
Now setup a bright light in the other room, also in front of the doorway. The door serves as a way to block and control the light coming from the other room. To get the shot, just stand in front of the wall out of the way of the light coming in.
You might also want to setup some sort of reflector card behind the light as in the image above. You can use posterboard , paper or something else cheap that you have around that will bounce the light effectively.
Another take on this same setup is to use a window instead of a door. This is a little trickier as a window tends to light up the entire room but can be accomplished with great results under just the right conditions and by using a thick window shade to soften the light.

Outside Low Key

Another great way to get some nice low key shots without spending a fortune on lighting is to venture outside at night. Here nature takes care of the darkness element and you need only find a good light source.
Moonlight and streetlights are obviously great places to start. Parking lots are also perfect places to find drastically variable lighting conditions ideal for creating really dramatic shots.
low key photography tutorial

Camera Settings

For low key shots, the camera settings can actually vary quite widely. The trick is to minimize the light entering the camera while not making everything too dark. To illustrate, let’s take a look at some actual shots along with their respective settings.
low key photography tutorial
Here we see a nice solid black background and one primary light source. From the Flickr properties we can see that the exposure is at 1/80 sec, the aperture is f/6.3 and the ISO is at 100. Normally an ISO that low would produce an image that’s too dark under anything but decently bright conditions but here dark is exactly what the photographer wanted and the flash in conjunction with the reduced shutter speed served to fill out the areas that he wanted to expose.
The bonus of shooting at ISO 100 is that the image quality stays high and void of color noise, which has a tendency to really stand out against a black background. Let’s take a look at one more image and see if we spot any similarities.
low key photography tutorial
As you can see, even though this image is brighter, it was actually shot at 1/200 sec, significantly faster than the previous image. Although the aperture is letting in less light at f/13, the ISO is the same and it looks like there’s more available light in the scene. The extra light enables the photographer to shoot at a faster shutter speed while still pulling in plenty of detail.
The primary takeaway from these two images is to try your best to keep your ISO around 100-200 to keep the image both dark and noise-free. You’ll have to then play with your exposure and aperture to achieve the desired effect for your particular lighting setup.

Low Key Explored

The example images above are primarily portraiture, but you should definitely not stop there in your experimentation with low key lighting. Low key is excellent for product shots and anything else you really want to make look cool and stylish. Here are a few more images to get you thinking outside the box.

Tumbler Batmobile

flickr pic

Serve Chilled

flickr pic

Cherry Tomatos

flickr pic

White flower in black background

flickr pic

On black_3535

flickr pic

budding

flickr pic

eat me

flickr pic

curl

flickr pic

Pink Daisy

flickr pic

Conclusion

To sum up, low key lighting is a highly dramatic way of enhancing the contrast in an image that has roots tracing way back to the Baroque period and beyond. You can achieve this effect indoors with studio equipment or some ingenuity and outside at night in a dark area with a well-placed light source.
As always, we want to give you an opportunity to show off your work. Leave a comment below with a link to your low key shots along with a quick explanation of your lighting setup and camera settings.

luni, 14 ianuarie 2013

Facebook Wallpapers (Articol Bonus)


DIGITAL CAMERA SENSORS

A digital camera uses an array of millions of tiny light cavities or "photosites" to record an image. When you press your camera's shutter button and the exposure begins, each of these is uncovered to collect and store photons. Once the exposure finishes, the camera closes each of these photosites, and then tries to assess how many photons fell into each. The relative quantity of photons in each cavity are then sorted into various intensity levels, whose precision is determined by bit depth (0 - 255 for an 8-bit image).
digital camera sensor Cavity Array
light cavities Light Cavities
However, the above illustration would only create grayscale images, since these cavities are unable to distinguish how much they have of each color. To capture color images, a filter has to be placed over each cavity that permits only particular colors of light. Virtually all current digital cameras can only capture one of three primary colors in each cavity, and so they discard roughly 2/3 of the incoming light. As a result, the camera has to approximate the other two primary colors in order to have full color at every pixel. The most common type of color filter array is called a "Bayer array," shown below.
bayer array Color Filter Array
digital camera sensor color filter Photosites with Color Filters
A Bayer array consists of alternating rows of red-green and green-blue filters. Notice how the Bayer array contains twice as many green as red or blue sensors. Each primary color does not receive an equal fraction of the total area because the human eye is more sensitive to green light than both red and blue light. Redundancy with green pixels produces an image which appears less noisy and has finer detail than could be accomplished if each color were treated equally. This also explains why noise in the green channel is much less than for the other two primary colors (see "Understanding Image Noise" for an example).
Original Scene
(shown at 200%)
What Your Camera Sees
(through a Bayer array)
Note: Not all digital cameras use a Bayer array, however this is by far the most common setup. The Foveon sensor used in Sigma's SD9 and SD10 captures all three colors at each pixel location. Sony cameras capture four colors in a similar array: red, green, blue and emerald green.

BAYER DEMOSAICING

Bayer "demosaicing" is the process of translating this Bayer array of primary colors into a final image which contains full color information at each pixel. How is this possible if the camera is unable to directly measure full color? One way of understanding this is to instead think of each 2x2 array of red, green and blue as a single full color cavity.
Bayer Array Converted Bayer Array
This would work fine, however most cameras take additional steps to extract even more image information from this color array. If the camera treated all of the colors in each 2x2 array as having landed in the same place, then it would only be able achieve half the resolution in both the horizontal and vertical directions. On the other hand, if a camera computed the color using several overlapping 2x2 arrays, then it could achieve a higher resolution than would be possible with a single set of 2x2 arrays. The following combination of overlapping 2x2 arrays could be used to extract more image information.
interpolated sensor bayer array
Note how we did not calculate image information at the very edges of the array, since we assumed the image continued on in each direction. If these were actually the edges of the cavity array, then calculations here would be less accurate, since there are no longer pixels on all sides. This is no problem, since information at the very edges of an image can easily be cropped out for cameras with millions of pixels.
Other demosaicing algorithms exist which can extract slightly more resolution, produce images which are less noisy, or adapt to best approximate the image at each location.

DEMOSAICING ARTIFACTS

Images with small-scale detail near the resolution limit of the digital sensor can sometimes trick the demosaicing algorithm—producing an unrealistic looking result. The most common artifact is moiré (pronounced "more-ay"), which may appear as repeating patterns, color artifacts or pixels arranges in an unrealistic maze-like pattern:

Second Photo at 65% of Above Size
Two separate photos are shown above—each at a different magnification. Note the appearance of moiré in all four bottom squares, in addition to the third square of the first photo (subtle). Both maze-like and color artifacts can be seen in the third square of the downsized version. These artifacts depend on both the type of texture and software used to develop the digital camera's RAW file.

MICROLENS ARRAYS

You might wonder why the first diagram in this tutorial did not place each cavity directly next to each other. Real-world camera sensors do not actually have photosites which cover the entire surface of the sensor. In fact, they often cover just half the total area in order to accommodate other electronics. Each cavity is shown with little peaks between them to direct the photons to one cavity or the other. Digital cameras contain "microlenses" above each photosite to enhance their light-gathering ability. These lenses are analogous to funnels which direct photons into the photosite where the photons would have otherwise been unused.
Microlens Array Diagram
Well-designed microlenses can improve the photon signal at each photosite, and subsequently create images which have less noise for the same exposure time. Camera manufacturers have been able to use improvements in microlens design to reduce or maintain noise in the latest high-resolution cameras, despite having smaller photosites due to squeezing more megapixels into the same sensor area.